This chapter contains the following topics:
Definition of Voiding and Purging Checks
Printing and Posting Voided Checks
Checks are said to be purged when old checks are removed from the file after the employee has cashed them. They are said to be voided when they are removed from the file because the employee has not cashed them at all (for instance, if a check was lost in the mail, or if the employee points out an error and requests a replacement).
Purging is a one-step process, and occurs as soon as you enter the transaction. Voiding is a two-stage process: transactions are first entered and then posted.
As many as 999,999 pay cycles can be accumulated at any one time, so the only reason to purge checks is to free up disk space or improve performance. You should not however purge a pay cycle until you are confident that all checks in that cycle have been cashed or otherwise accounted for.
If you have set the Summary post distribs field checked in Control information, skip this selection.
This feature lets you void individual checks or ranges of checks at will. A separate selection is provided for each method, and each can be executed as often as needed until you are satisfied that all the void checks, and only those checks, have been correctly flagged. You can void a range of checks and then use the individual selection method to unvoid any checks that you do not want to void. You can then post void checks. A Payroll Voided Check Register will print.
Void checks is intended for checks written in the recent past. A check cannot be voided if:
| • | Any of the following have been purged: |
The check’s Payroll distributions
The check itself
| • | The year has been closed since the check was written. |
Note that if the year has not been closed a check can be voided even though W-2’s have already been printed.
When this happens it is your responsibility to rerun the W-2 process for that employee.
This only applies if Payroll is interfaced to Job Costs per the J/C Control information. If Job Cost distributions have been purged or there never where any distributions because the payment was not assigned to a job, it will still allow you to purge the payment. However it will put NO J/C DETAIL REC FOUND in the reference. In this case the reference cannot be changed.
Voiding Direct Deposits
In general, this applies to both electronic payment direct deposit and report only direct deposit, unless otherwise indicated. For a description of both methods, see the Direct Deposit Settings section of the Control Information chapter.
A void checks posting will not reverse direct deposits if your bank has already sent the payments to the employee's accounts. Also, it will not write or update records in an ACH file when using electronic payment.
However, if you have not submitted the ACH file or direct deposit report to your bank or you have made a submission, but the bank is not going to make the payments to the employee's accounts, you may void existing direct deposit payment records. As you cannot void individual payments in an electronic payment ACH file, you must void ALL the direct deposit payments made after a check (direct deposit) run. Then you should either mark the ACH file in some manner by renaming it as voided, delete it if you don't retain copies, or any other method that will help prevent it from being mistakenly submitted to the bank.
An exception could occur, depending on your bank's policies, that you can specify your bank to not make a direct deposit payment to a particular employee, even if it is in the submitted ACH file. Then you may void that employee's payment. In this case, your copy of the ACH file will be inaccurate. It is not necessary to retain copies of submitted ACH files, but if you do, you may want to create a text file of the same name as the ACH file with a different extension with an explanation of what happened.
Select
Individual checks from the Void checks menu.
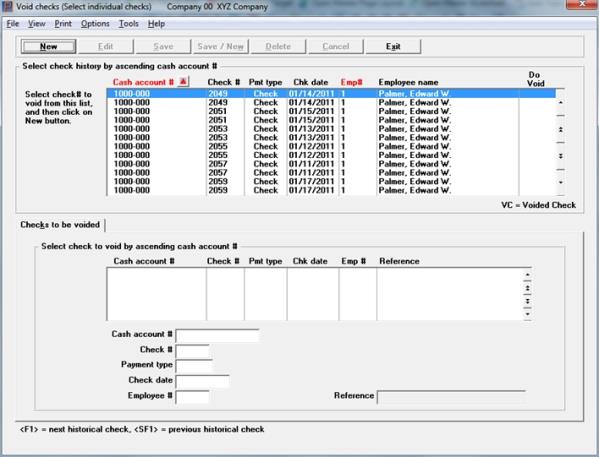
If you choose Select individual checks, this is the screen that displays:
Graphical mode
Select the check # or ACH payment to void from the upper list box. Then click on the New button or enter <Alt+N> to select and indicate that the check is to be voided.
This screen has 2 list boxes.
The upper list box displays up to 12 existing checks and ACH payments at a time. The records are from the Void Payroll Checks file/table (VDMTRX). You may sort the payments by cash account or employee number both in ascending or descending order. Only columns with red labels may be sorted. To select a field or change the sort order, click on the column name or the arrow to the right of the column name or use the View options.
To locate a payment, start typing a cash account or employee number, depending on which sort field is selected. The default sort is employee number. You may also use the up/down arrows, Page up, Page down, Home and End keys to locate an entry. The <F1> and <SF1> keys function the same as the up/down arrow keys.
Payments that display in the upper list box are available for voiding. After selecting a check in the upper list box, click on the New button or enter <Alt+N> to indicate that the check is to be voided. Then it will display in the lower list box and you may edit the Reference field.
If you are using Report only direct deposit, the Pmt type column will indicate a check type because a check number was used. If you are using Electronic payment "ACH file" direct deposit, the payment type will indicate ACH payment. In either case, a warning displays letting you know that the payment was made via direct deposit.
Payments marked to be voided will have a Yes in the Do void column. Payments already voided will have a VC in the column.
You may click on a button or enter the keyboard equivalent for adding, editing, deleting or canceling a payroll entry:
| Button | Keyboard | Description |
|
New |
Alt+n |
With the focus on the upper list box, use to select a payment for voiding |
|
Delete |
Alt+d |
With the focus on the lower list box, use to remove a payment from voiding. You may also use the <F3> key. This button is not accessible by using the Tab key |
|
Edit |
Alt+e |
With the focus on the lower list box, use to edit the void check selection. This button is not accessible by using the Tab key |
|
Save |
Alt+s |
To save a new void check selection or changes to an void check |
|
Save/New |
Alt+w |
This button is not active on this screen |
|
Cancel |
Alt+c |
To cancel adding or editing a void payment |
|
Exit |
Alt+x |
To exit the screen. You may also use the <Esc> key |
Menu Selections
Many of the menu selections are the same for each screen. The sorting View selections are alternative ways to sort the data. The other selections that are unique to this screen include:
| Main | Sub menu | Link to more information |
|---|---|---|
| Edit list | Print Edit List | |
| Employee payroll history | Employee Payroll History Report | |
| Options | Post | Posting Voided Checks |
Enter whatever reference you want.
|
Format |
25 characters |
|
Example |
Press <Enter> |
Character Mode

From this screen you can work with both new and existing void check entries, whether these originated by the Void individual payroll checks selection or the Void range of payroll checks selection.
1. Cash account #
Options
Enter the cash account number.
|
<F1> |
For the next void check entry |
|
<SF1> |
For the previous entry |
|
<F2> |
For the next cash account |
|
<SF2> |
For the previous cash account |
|
Format |
Your standard account number format, as defined in Control information |
|
Example |
Enter account 1000-000 |
2. Check number
Enter the number of the check you want to void.
|
Format |
999999 |
|
Example |
Type 8025 |
3. Check date
Enter the date of the check that was written.
|
Format |
MMDDYY |
|
Example |
Type 30215 |
4. Employee number
Enter the employee number
|
Format |
999999 |
|
Example |
Type 5 |
5. Reference
Enter whatever reference you want.
|
Format |
25 characters |
|
Example |
Press <Enter> |
Field number to change ?
Options
Make any needed changes and press <Enter>. You may also use one of the options:
|
<F1> |
For the next void check entry |
|
<SF1> |
For the previous entry |
|
<F3> |
To delete this entry (valid for existing entries only) |
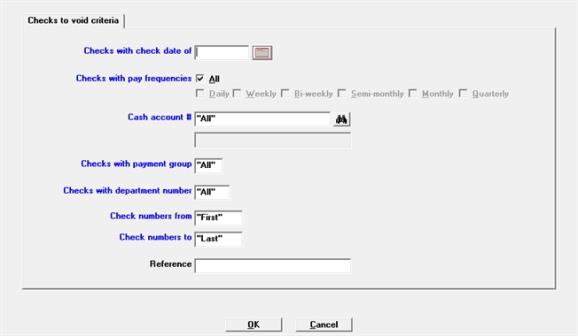
If you choose Select a range of checks, the following screen displays:
Graphical Mode
Character Mode
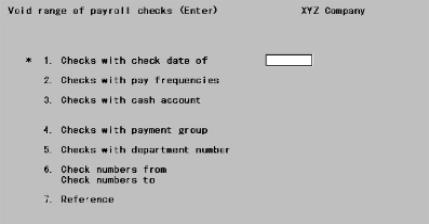
This selection lets you create new void check entries. Refer to the previous section for processing existing entries.
|
Note |
Only checks that meet the requirements of all the fields below, except Reference, will be voided. |
Enter the date the checks were written.
|
Format |
MMDDYY |
|
Example |
Type 30215 |
Options
Enter the pay frequency of the checks to be voided. You can specify:
| Character | Graphical |
|
D |
Daily |
|
W |
Weekly |
|
B |
Bi-weekly |
|
S |
Semi-weekly |
|
M |
Monthly |
|
Q |
Quarterly |
|
<F5> |
<F5> = "All" frequencies |
|
Format |
Graphical: Check box, where checked is selected and unchecked is not selected Character: One letter from the list above |
|
Example |
Press <F5> |
Options
Enter the cash account of the checks you are voiding. This must be a valid entry in Cash accounts. You may use one of the following options:
|
<F1> |
For the next cash account |
|
<SF1> |
For the previous cash account |
|
<F5> |
To void All checks regardless of cash account |
|
Format |
Your standard account number format, as defined in Company information |
|
Example |
Type 1000-000 |
Options
Enter the payment group code for checks you are voiding, or use the option:
|
<F5> |
To void "All" checks regardless of payment group |
|
Format |
Three characters |
|
Example |
Press <F5> |
Options
Enter the department number for checks you are voiding, or use the option:
|
<F5> |
To void "All" checks regardless of department number |
|
Format |
9999 |
|
Example |
Press <F5> |
Check numbers to
Options
Enter the range of check numbers you are voiding, or use the option:
|
<F5> |
To void All checks regardless of check number |
|
Format |
999999 |
|
Example |
Type 8025 at each field |
Enter whatever reference you want. Unlike the previous fields, this field is not used to select which checks to void. It will be used as the reference in the G/L transaction for each voided check.
|
Format |
25 alphanumeric |
|
Example |
Press <Enter> |
Make any needed changes. Click OK to select the range of payments to be voided or click Cancel to return to the menu without selecting any payments.
This section explains how to print a void check edit list and post voided checks.
Select
Select Edit list from the Void checks menu.
The printer selection screen displays. Select a printer, Create HTML, Print to disk or Display on screen.
Select
Select Post from the Void checks menu.
The printer selection screen displays where you can select a printer or Print to disk.
Voided check information is posted to the Payroll Distribution file, the Employee file, the Payroll History file, the QTD History file, YTD History file, and the YTD state and city History file.
If Payroll is interfaced to the Job Cost package, distribution information is posted to the Job Detail file.
A Payroll Voided Checks Register is printed, and the entries on file in the Void individual checks selection are deleted.
Interface to Check Reconciliation
Per the Check Reconciliation Control information you may be setup to automatically post to the C/R Check Book (CKBOOK). When you are automatically posting to Check Reconciliation, the Voided Check Register will include this message:
*** Transferred to Check Reconciliation ***
If you are not setup to automatically post, you must run the Transfer checks\deposits function on the C/R menu to pull the data into Check Reconciliation.
Whether the system is auto-posting or you are transferring manually, the cash account used must be setup as a checking account in C/R in order to interface to C/R.
Use this selection to purge voided payroll transaction records.
When a check is written, information for that check is saved in case the check must be voided at a later date.
If you use ODBC or SQL for reporting, purged data is no longer accessible. However, once you are sure that the checks printed on a specific date will not have to be voided (that is, that they have cleared the bank) and you no longer need the data for reporting purposes, you may run Purge payroll transactions.
This function will purge records from the Void Payroll Checks (VDMTRX) file/table only. If you want to purge records from the Payroll history file/table (KHISFL), check the Purge file field when running the Employee Payroll History Report.
Select
Purge payroll transactions from the Utility menu.
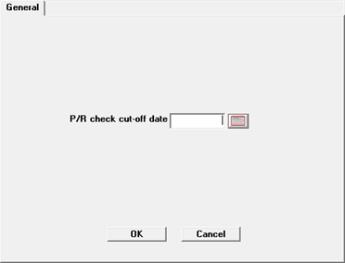
The following screen will appear:
Graphical Mode
Character Mode
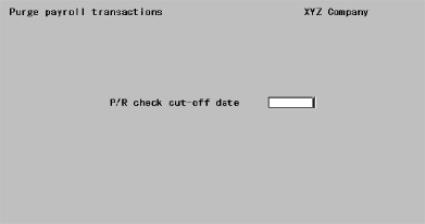
This is the latest check date for which to purge saved check information. Enter the date or use the calendar to locate and return a date to the field.
|
Format |
MMDDYY There is no default. |
|
Example |
Type 123112 |
Select OK to proceed with the purge. Select Cancel to return to the menu without purging.
Once information for a check is purged, you can no longer void that check using Void checks. Instead, you must key in a negative check and post it. If many checks need to be voided, this can be a greater task than processing payroll; therefore, beware not to purge the saved check information until you are sure you will not need to void those checks.